Envira Gallery Blog
Digital Photography Tips, Tutorials and Resources
Digital Photography Tips, Tutorials and Resources

by Alexandra Bateman on Jun 11, 2020
Do you want to sell your photography on your own WordPress site? As a professional photographer, you may want to sell photos from your greatest adventures online. In this article, we will share how to sell your photos in WordPress using Envira Gallery and WordPress’ WooCommerce plugin.
Every independent photographer knows that, to be successful, you have to find a way to monetize your image catalogue. Believe it or not, your collection of amazing photos can earn you a substantial income! That’s why it’s important to post those photos for sale on your WordPress photography website using a few helpful tools.
Here’s what you’ll need to sell your photos in WordPress:
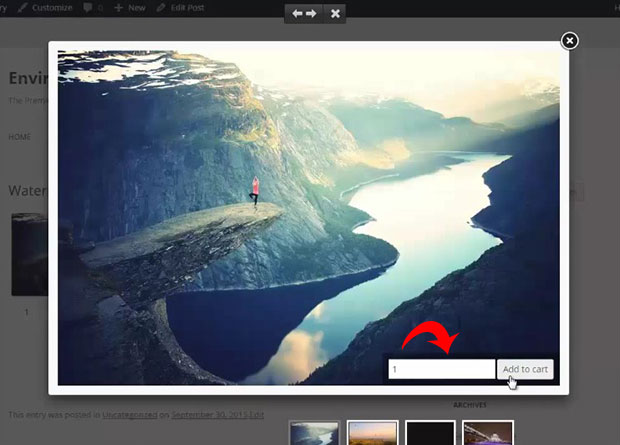
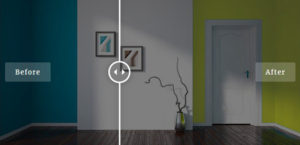
By the end of this tutorial, you will have created a WordPress image gallery that allows users to purchase your photos via an “Add to Cart” button:
Selling your photography online with WordPress has never been easier! Ready to get started? Let’s go!
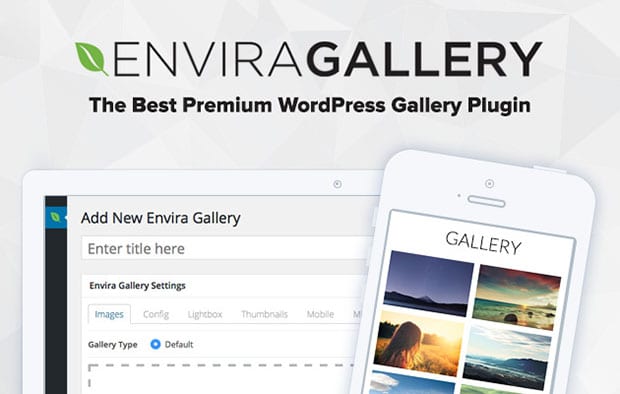
The first thing you need to do is install and activate the Envira Gallery plugin. This plugin will help you create customized image galleries that are perfectly tailored for your WordPress site. You’ll need beautiful image galleries displaying your photos in order to draw in potential customers.
Read our guide to learn how to install Envira Gallery once you’ve downloaded it. After you’ve installed and activated Envira Gallery plugin, you can move on to the next step.
Envira Gallery is a WordPress plugin so, to create an image gallery on your WordPress website, you’ll have to log in to your WordPress admin dashboard.
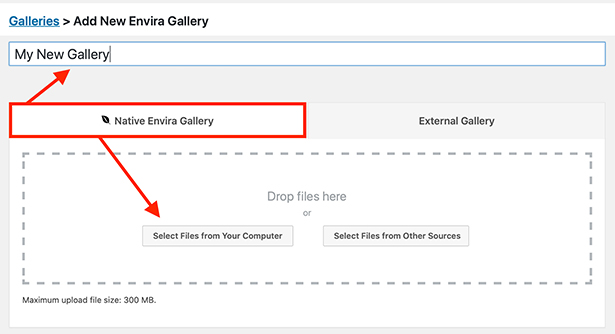
Navigate to the vertical toolbar on the left-hand side of the page, and choose Envira Gallery » Add New to create a new Envira image gallery.

Next, give your new image gallery a unique title, then import photos from your computer or WordPress Media Library to populate the gallery. Use the options in the Native Envira Gallery tab to import your photos.
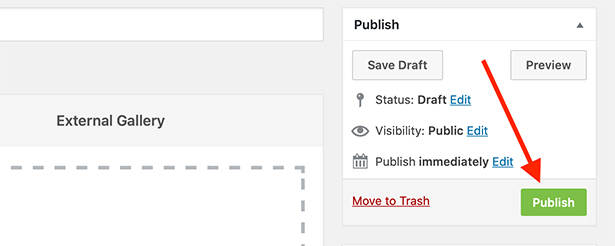
After you add your photos, simply click the Publish button to publish your new gallery.
Once you’ve published your new gallery, you’ll see a box containing Envira Gallery shortcodes directly underneath the box that contains the Publish button.
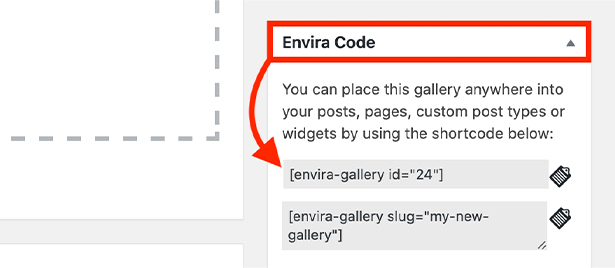
Copy the shortcode from Envira Gallery Code widget. You’ll need this code for Step 5 below.
For more help with this step, check out our guide on how to create an image gallery with thumbnails in WordPress.
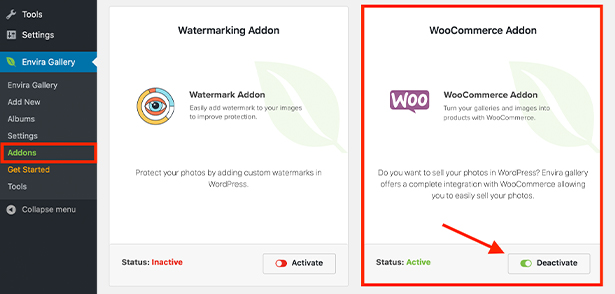
Now that you’ve created an image gallery, you’ll need to install Envira’s WooCommerce Addon so you can start selling your photos online.
Envira’s WooCommerce Addon comes with Envira Pro and Ultimate licenses. If you’re using the Envira Gallery demo, you’ll need to upgrade your license to access this feature. Learn more about how to upgrade your license in Envira here.
Once you’ve upgraded to Envira Pro or Ultimate, head to Envira Gallery » Addons in your WordPress dashboard. Then, find the WooCommerce Addon card and click Install, then Activate, to equip your site with the addon.
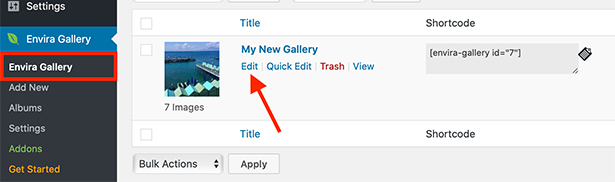
Now, you’ll need to enable the WooCommerce plugin to work on the image gallery you just created.
To do that, select Envira Gallery in the left-hand panel, then click to edit your most recent image gallery:
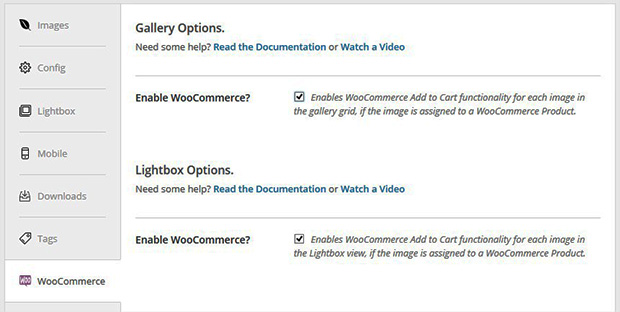
Scroll down the page to see the customization options for your newest image gallery. Now that you’ve activated the WooCommerce plugin, you’ll see a WooCommerce tab in the list of customizations.
Check the box to Enable WooCommerce for both the Gallery and Lightbox options.
Now, navigate back to the Images tab of the customization options, and click the pencil icon to modify the meta information for each photo.
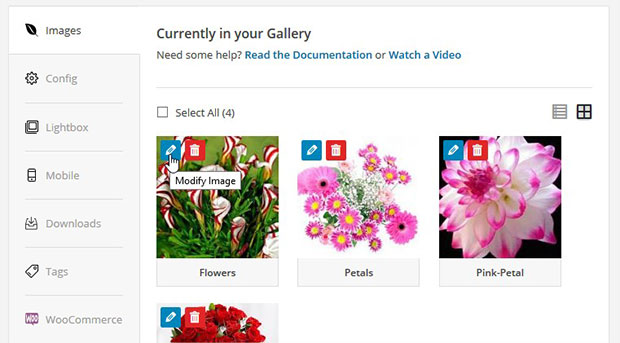
In the WooCommerce Product dropdown, select the product that corresponds to your image.
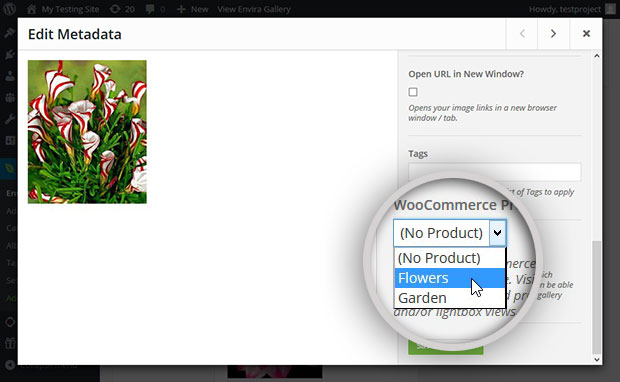
Once you’re done, click on the Save Metadata button. Repeat this process for all the photos you want to sell.
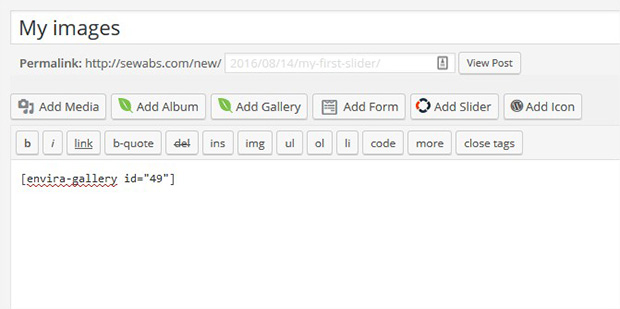
To add your image gallery to your site, choose the post or page where you want your gallery to appear and choose Edit. Alternatively, you can place your gallery on a new page or blog post by selecting Post » Add New or Page » Add New.
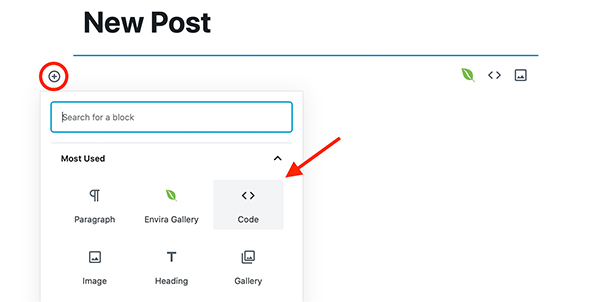
Then, simply paste the shortcode that you copied in the step 2 into the visual editor.
If you’re using WordPress’ new Gutenberg editor, you’ll need to add a new shortcode block in order to paste your shortcode correctly.
Then, update your post to publish your changes, and go to your website. You’ll now see an Add to Cart button on images in the gallery and lightbox! Your customers will then find the image they want in their shopping cart, ready to purchase.
This method works for both print photos that you plan to mail and selling digital photos that your customers can print from home.
Please note: In order to link your photos to products, you’ll need to have already created your products in WooCommerce. That means you should prioritize installing WooCommerce and setting up your WooCommerce store first before linking any photos in your WordPress online store using the WooCommerce plugin.
You may want to offer buyers several buying options on the same image. For example, you may want to offer customers the option to buy your printed image with either a matte or glossy finish, or order the photo as a print in different sizes. You can do this easily with Envira Gallery plugin and the WooCommerce Addon!
WooCommerce has a built-in variable product option, which allows you to offer multiple options on the same product. To do this, create a single WooCommerce product in your WooCommerce store, then add variables to that product.
Again, your variables could be image size, printed image finish or even image format! You can even set these product variables to have different prices if you choose.
Then, link the image in your Envira Gallery to the WooCommerce product page and its variables will appear.
If you’re a professional photographer, chances are that you have a large catalogue of photos that you might want to sell online. For so many images, it may seem daunting to have to create a WooCommerce product for each image in your collection.
Fortunately, you don’t! With the WooCommerce Addon, you can set multiple images to pull from the same WooCommerce product. That way, you only have to create one or two product pages that link to all the photos in your gallery.
Really, it just depends on the structure you choose for your WooCommerce store!
That’s all! We hope this article has helped you to learn how to sell your photos in WordPress.
Starting an online WordPress photography store can be a rewarding experience for both beginner and professional photo sellers. Having your own WordPress photography store from which customers can purchase photos directly means more money in your pocket and more eyes on your artwork.
To help you get started, you may also want to check out these guides to selling photos online:
If you like this article, follow us on Facebook and Twitter for more free WordPress tutorials!
Envira Gallery helps photographers create beautiful photo and video galleries in just a few clicks so that they can showcase and sell their work.


So you have to create a product for each image in your gallery? what if you have thousands of photos, you need thousands of products?
Hi Darie, as you can see in Step 4 that you can choose a WooCommerce product for each image, so you can assign multiple photos to one product. You don’t need to create thousands of products for your photos. This post is particularly for the photographers or any other photo sellers to sell their amazing photos online. They can easily create the product(s) and add photos related to it to take orders from their website. 🙂
Waseem, you didn’t answered Darie question. Please answer the question.
Hi Pierre, hope that answers the question. 🙂
The question is – does each photo need to have its own product? If you have thousands of photos to sell, do you have to create a product for each photo?
Hey Kevin, as mentioned above, you can see Step 4 for your answer. You can assign multiple photos to one product that means you don’t need to create a product for each photo. 🙂
How do I sell my photos online ???
How would you add multiple product options to a single photo? If I have a portrait, for expamle, and I want to give the client the option of purchasing it in various sizes, how would I set that up?
Hi Meagan 🙂 You can certainly use the Woocommerce variable product for such a thing. You would create 1 Woocommerce product and then add variables to those products, such as 8×10, 5×7 etc. Woocommerce demo would show those options on one of their demo products as colors, so imagine instead of colors, it would be sizes.
This is an Envira gallery using the Woocommerce Addon with a variable product: http://cloud.supportally.com/2A0k3J2z3k46
Does that help? If you have any trouble at all, you can always pop over to support to ask for some assistance! We’re always there and happy to help!
Hello,
Is it possible to make two different options, for example “matt” and “gloss” and then different sizes linked with these two options?
Hi Tomek 🙂
Absolutely, using Woocommerce variation list you can create a different variation which could have different pricing structures as well.
Can I help answer anything else for you today?
Can you explain with more clarity how can we setup multiple photos for the same product? As far as I’ve explored to be able to download something while buying, I must have a file assigned to each product via the WooCommerce panel. Operating this way I would have to create as many products as there are photos to be sold, which is obviously not interesting at all.
Hey Stefano, it has been explained in the comments above. 🙂
If I’m not mistaken that it is true for physical photo selling. If you want to do digital selling, meaning that after the purchase, customer can download the images, you need to create one product per image.
As I am a digital selling, this addon is not of much help for me, as I cannot and do no a easy way to create per session 200 products in woocommerce…
Can you clarify how the association of products work for digital downloads?
Hey Hugo, it vary from case to case. For example an album has multiple images and it can be sold as one product. Hope that helps. 🙂
Waseem your explanation of adding multiple images to a product isn’t very clear. if i add multiple images and i buy that one product, am i getting all the images or am i getting the one image that i really want?
Is there a possibility that you send me a few sample pages by e-mail where I can look at the function? So far everything sounds great. I would just like to see it live before I buy it. Thank you and best regards. Hans
We’d be happy to! Shoot us a msg from here: https://enviragallery.com/contact and we’ll be happy to help.
Regards,
Nathan
We already have our travel photography for sale on Fine Art America. Through them, we sell canvases in various sizes and our photos on different products. We don’t want to set up a WooCommerce site and have to handle orders and shipping ourselves. Plus, we don’t have nearly enough server space with our site host to upload our original size photos, and we would need to do that to sell large print images. Which leads to my question. Is it possible to set up the shopping feature of Envira but link each photo we want to sell via URL back to where it’s listed on Fine Art America?
Absolutely, you just need to edit your gallery and then click on the blue pencil icon to edit the image. That will open up a pop up window called Edit Metadata. There on the right of the image are fields to enter metadata about each image. One of those fields is a URL field. You can enter the URL there and even check the box to open the image in a new window if you wish. You can then use the right/left arrows at the top of the pop up to navigate through all the gallery images to repeat these steps and click the X button in the top right corner when done. Just update the gallery and you’ll be all set! Hope that helps!
When I edit the URL on an image to go to my Fine Art America store, the thumbnail is no longer visible in my gallery on my website.
Can an Album be created and all the photos in the individual galleries be linked to a product and the album inserted on a page?? (Just like a gallery??)
the main problem here is that you have to upload echa photo as a product perhaps a single product or a variable product but if you have thousands of photos per event and weekly events this is not possible for you, if you manage to upload every photo automatically and to create every photo as a product automatically you would sell your plug alot more and i mean alot, because that the main issue with photographers
I am a beginner looking to make some money from selling of my photos.Please let me know how I would get paid if anyone buys my photos. Is it via PayPal. Also are the uploaded photos copyrighted to prevent others downloading them for free and passing them off as their own
What formats and file sizes do you accept
Is it possible to have the add to cart buttons appear alongside the image rather than on it?
Hello! I am photographer and i want to make some money by selling photos. Please anybody could help will much appreciated.
Am I allowed to create that website If im under 18 ?
Very nice. Thanks for that!