Envira Gallery Blog
Digital Photography Tips, Tutorials and Resources
Digital Photography Tips, Tutorials and Resources

by Brenda Barron on Jan 14, 2019
Want to get the most out of your editing sessions?
Many professional and amateur photographers alike rely on things like Adobe Lightroom and Photoshop to help them enhance their portfolios.
Tools like Lightroom come with a selection of excellent features to choose from, including presets – files that allow you to apply specific settings to each image at the click of a button.
The question is, how do you find the Lightroom presets you need to use on your images?
There are few things more frustrating than not being able to track your Lightroom presets folder location. With that in mind, we’ve put together this article to help you make the most out of your editing tools. Here, we’ll look at:

Before we answer the question of how to find Lightroom presets, it’s important to make sure that you know what you’re looking for. Essentially, a Lightroom preset is your opportunity to make editing and improving your images as simple as possible.
A Lightroom preset is a digital add-on that comes equipped with specific settings for the various features in Lightroom. Rather than having to apply multiple changes to your images manually, you can use your preset to transform your photo with a single click. You can also layer different presets on top of each other to achieve a unique design.
Some photographers use their presets to make their pictures look like old-fashioned film, while others simply remove flaws from photos by adjusting lighting and contrast.
There are plenty of websites online where you can download free, and premium Lightroom presets. Once you’ve found the solution you want, installing it is simple enough. Simply click the download button on the preset file to start. You’ll have to unzip the file to access the folders within, as they usually come compressed.
After the download has completed, open Lightroom and enter the “Develop” tab. You’ll see your presets populating the left-hand side of your screen. You can also right-click on your presets module to “Import” presets from the folder where you unzipped the contents of your download.

If you’re wondering how to find Lightroom presets on your computer without going into the application, remember that you may have to access hidden files.
To find the Lightroom presets that you recently downloaded onto your computer, visit your hidden files. On a Mac computer, this will mean going into your Finder window and clicking on the “Go” menu item while holding your “Option” key. When you hold option, you’ll be able to find your library folder. On a Windows computer, go into your start menu and click on the control panel. Next, click on Appearance and Personalization and go into your folder options. In the Advanced tab, you should be able to select “Show Hidden Files and Folders.”
Typically, on Mac OSX you’ll find your Lightroom location in the Application Support folder for Adobe, within the “Develop Presets” file. With the Windows OS, your presets will still be in the Develop Preset Folder, but under the AppData and Roaming files.
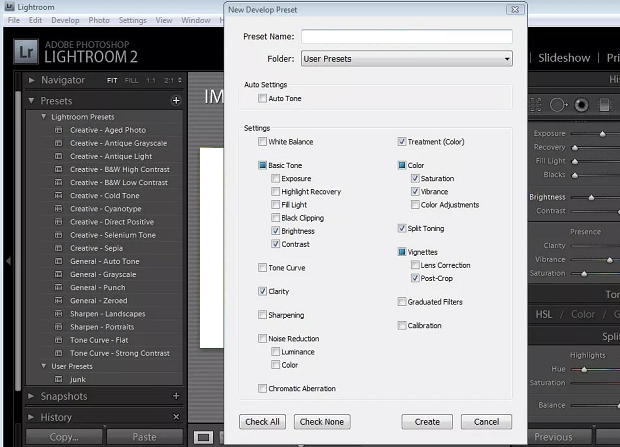
One way to manage your presets as effectively as possible is to learn how to make them yourself. All you need to do to make a Lightroom preset is make changes to your images. For instance, you might start by adjusting the tone curve, then changing the contrast slightly on your content.
To save the look you create, simply go into the Presets panel on Lightroom and click on the + tab in the panel header. Here, you’ll be able to choose the option for New Preset in the Developer menu, or you can use the Shift + Command + N shortcut on Mac, or the Shift + Control + N shortcut on PC.
Once you’ve saved your creation, you’ll know how to find Lightroom presets by following the steps above.
Adobe Lightroom presets are a great addition to any photographer’s toolkit, as they make it easier to edit large batches of photos with speed and simplicity. Whether you’re just getting started or you’re a photography pro, presets can enhance your images in a variety of fantastic ways, and now you know how to find Lightroom presets on any device!
For more tips and insights into using Lightroom, don’t forget to follow us on Facebook and Twitter.
Envira Gallery helps photographers create beautiful photo and video galleries in just a few clicks so that they can showcase and sell their work.