Envira Gallery Blog
Digital Photography Tips, Tutorials and Resources
Digital Photography Tips, Tutorials and Resources

by Brenda Barron on Nov 22, 2018
Did you know one of the easiest ways to edit your photography in a hurry is to use a Lightroom preset?
Presets are collections of filters on Adobe Lightroom that instantly transform your photos with different contrast, brightness, exposure and saturation levels.
There’s a preset pack out there for virtually anything you could want, whether you’re shooting a wedding, or snapping photos of a newborn baby. The question is, how do you install Lightroom presets into your favorite editing tool?
Today, we’re going to go through the 3 simple steps it takes to install your Lightroom presets, including:
Before you can figure out how to install Lightroom presets for either your computer or phone, you need to know where to find them. When you click the “download” button next to a preset pack, your device automatically stores the presets for you. The same thing happens when you create and “save” a preset on Adobe Lightroom.
The easiest way to find your folder of stored presets is to go to the Lightroom “Preferences” menu at the top of the screen. Once you click on the Preferences section, a new window will appear with a tab titled “Presets.” Click here to see this:
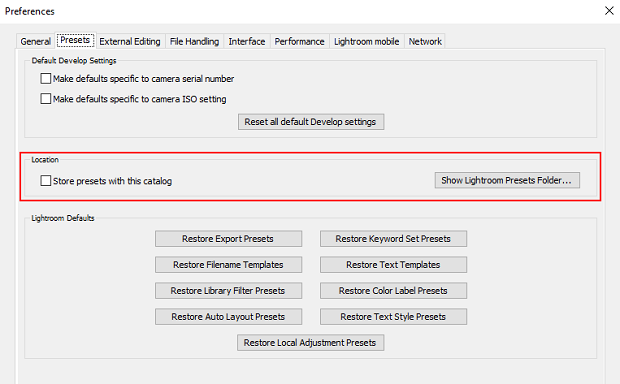
Click on the button that says “Show Lightroom Presets Folder…” and your Adobe tool will load the folder on your hard drive that contains your information for Lightroom. You’ll be able to see not only your presets here, but also a bunch of other important data that you may need to find later, so keep this in mind. The folder you want right now is the one that’s labeled “Develop Presets.”
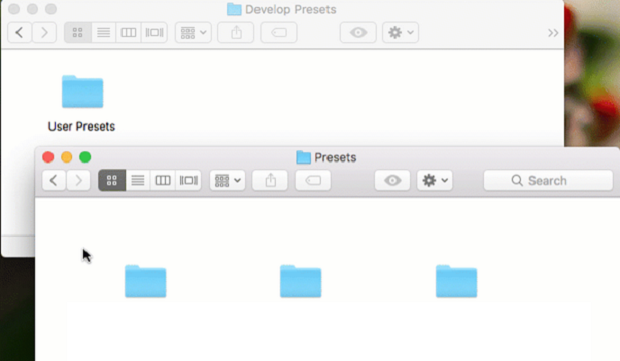
Once you know how to find your presets, the next step is to copy the files that you want into the right folder. When you click on the “Develop Presets” folder, you may see another folder inside called “User Presets”. This folder will only appear if you’ve created presets on Lightroom before now. Don’t worry if you haven’t.
In a separate window, locate the folder where you stored your newly downloaded Lightroom presets. If you can’t remember where you saved them, they’re probably located in your downloads folder. You can also simply search for the file name in your system’s menu.
With both windows open, simply click on the new folder of Lightroom presets that you want to install and drag them over into the “Develop Presets” folder.
That’s all it takes! You’re now almost ready to begin using your brand-new set of presets.
Before you jump straight into action and try to edit photos with your new presets, it’s important to remember that you need to restart your application. This final step might not seem very important at first, but your Adobe tool won’t load the new presets until it’s had a chance to restart.
Remember, you don’t necessarily have to restart your entire computer to use your new presets. Simply restart the Lightroom app by completely exiting out of the tool. If you have Lightroom pinned to your computer screen, then you may need to right click and select “Exit” to fully close down the tool.
When your restart is complete, your recently uploaded presets should appear in the left-hand side of your Develop module, just like any other preset you might have used before.
If your preset list came in a folder, then they will be sorted within folders in your Develop panel. Don’t panic, just click on the small triangle icon next to the name of the folder to open it, then click on the preset that you want to apply to your image. Remember that you can always adjust the settings on your presets if you need to!
There you have it! Figuring out how to install Lightroom presets on your computer isn’t as challenging as you might think. All you need to do is a little dragging and dropping, and you’ll have a simple way to edit your photos in no time!
Remember, if you enjoyed our guide to using Lightroom presets, you can find plenty of extra tips and assistance when you follow our Facebook and Twitter profiles!
Envira Gallery helps photographers create beautiful photo and video galleries in just a few clicks so that they can showcase and sell their work.


This makes me think of the other page I was looking at earlier.